
Indulge in Homemade Dairy-Free PB&J Chocolate Cups: Your Ultimate Vegan Treat!
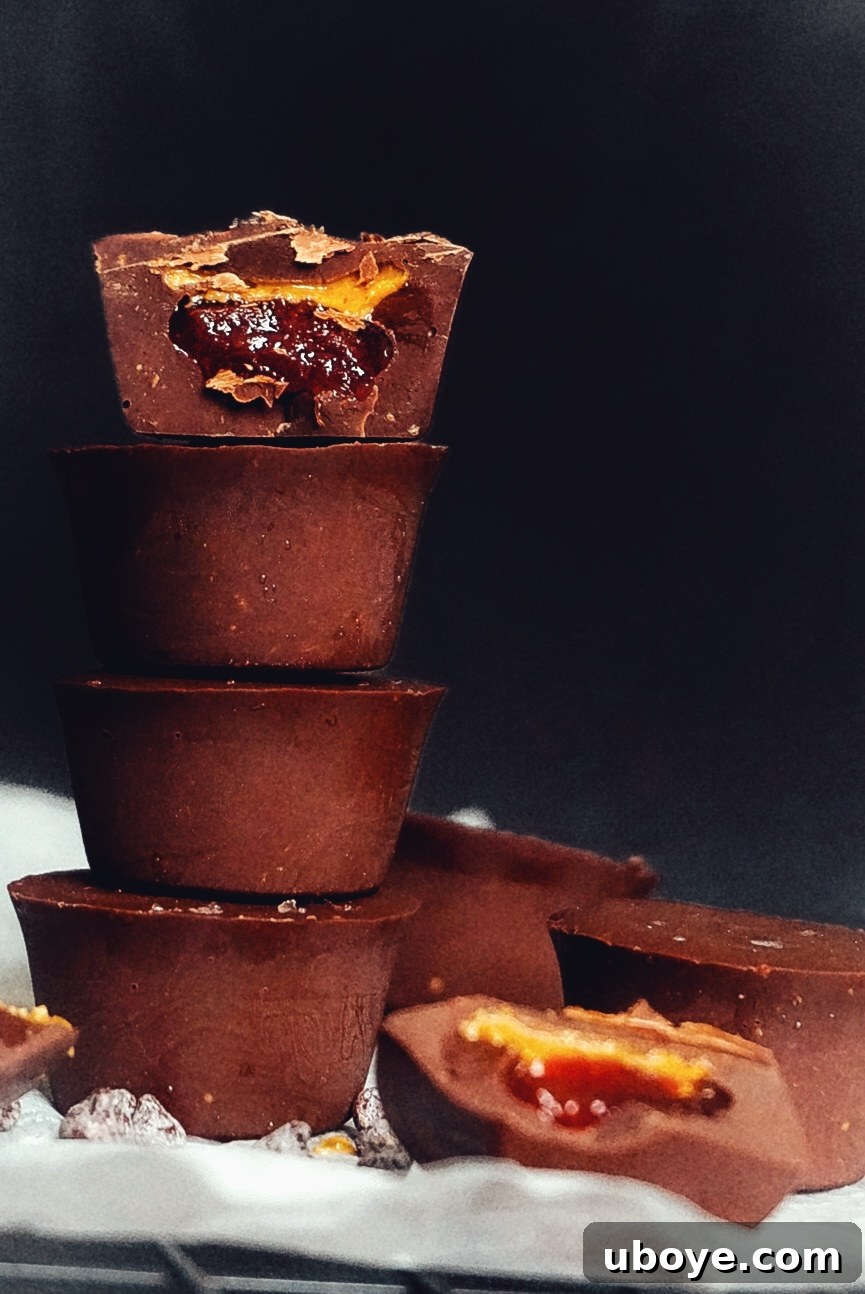
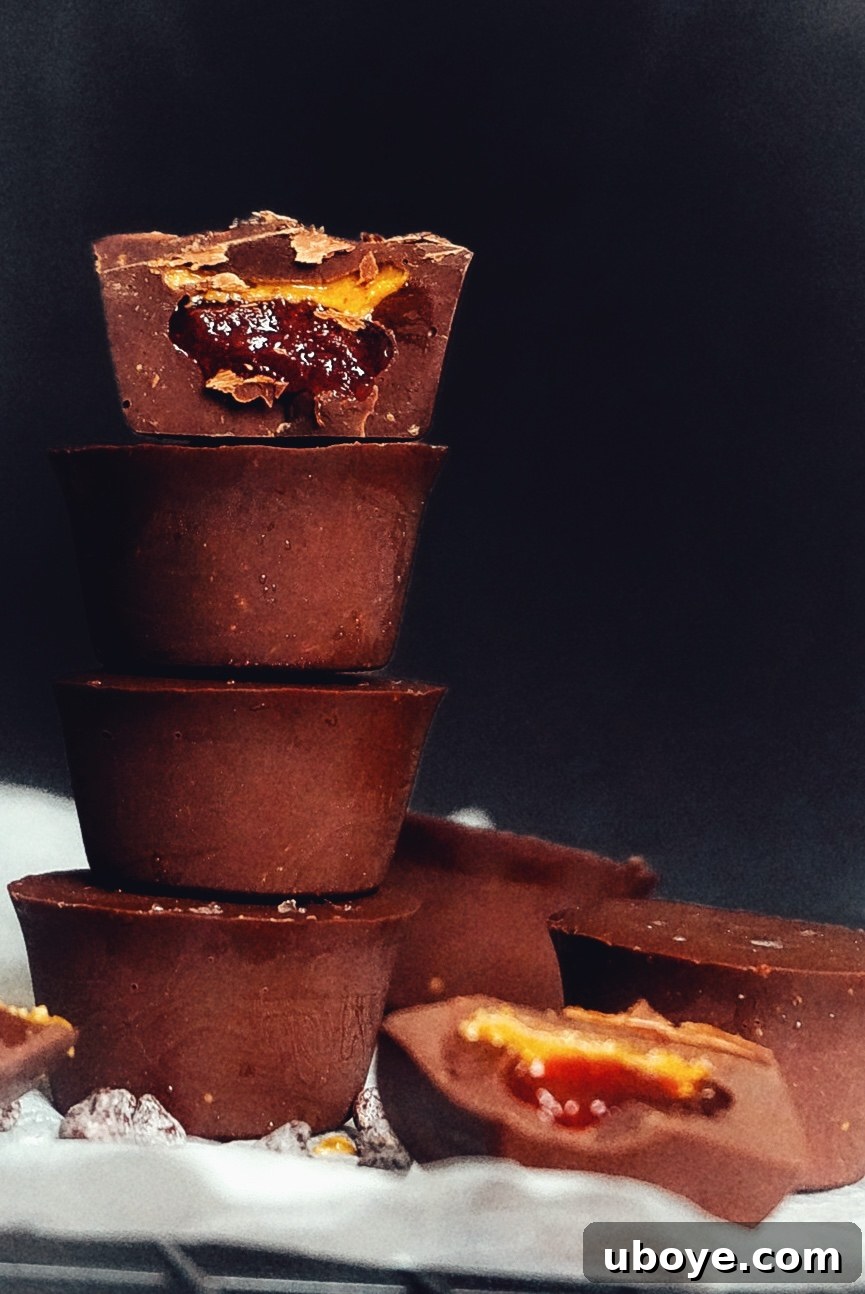
Prepare to revisit your fondest childhood memories, but with a sophisticated, plant-based twist! This recipe masterfully combines two universally beloved classics: the nostalgic peanut butter and jelly sandwich, and the iconic chocolate peanut butter cup. The result? An utterly irresistible, melt-in-your-mouth vegan treat that’s destined to become your new favorite. Imagine the rich, smooth embrace of chocolate, the creamy, nutty comfort of peanut butter, and a delightful burst of tart raspberry jam – all harmoniously united in one perfect bite. This isn’t just a dessert; it’s an experience, crafted to satisfy your sweet cravings while adhering to a dairy-free lifestyle.
What truly elevates these PB&J cups beyond a mere candy is the unexpected, vibrant heart of tart raspberry jam. This isn’t just a casual addition; it’s a critical component that introduces a bright acidity and a nuanced sweetness, perfectly cutting through the decadent richness of the chocolate and the savory depth of the peanut butter. This thoughtful balance of flavors prevents the treat from being overly sweet or heavy, ensuring each cup is a refreshing and deeply satisfying indulgence. It’s a symphony of textures and tastes, designed to surprise and delight your palate.
Beyond their exquisite taste, these homemade vegan PB&J Chocolate Cups boast incredible practicality. They are wonderfully meal-prep friendly, meaning you can whip up a batch on the weekend and enjoy these delightful bites throughout your busy week. The ease of preparation is another major highlight; even novice bakers will find this recipe straightforward and enjoyable. Since I first discovered the magic of combining these flavors and textures, these cups have become an unwavering staple in my kitchen. They’re simply too good, too convenient, and too universally loved to ever stop making them! Whether you need a perfect companion for your afternoon coffee, a sophisticated sweet to conclude a meal, or a delightful snack to share with salty buttered popcorn during a cozy movie night, these treats fit every occasion. Their versatility is unmatched, making them the ideal go-to for any moment that calls for a little sweetness.
I pour my heart into creating recipes that bring joy and deliciousness to your life, and these PB&J Cups are no exception. I sincerely hope you find as much delight in making and savoring them as I do. Get ready to fall in love with your new favorite vegan indulgence!
Dairy-Free PB + J Chocolate Cups
Nicole Vranjican
15 minutes
15 minutes
30 minutes
12 pieces
Rate Recipe
Print Recipe
Why These Vegan PB&J Chocolate Cups Are a Must-Try
In a world brimming with processed snacks, crafting your own treats offers unparalleled satisfaction and numerous benefits. These dairy-free PB&J chocolate cups stand out not just for their incredible flavor, but for the empowerment they offer to your plant-based journey. Here’s why they should be at the top of your baking list:
- Complete Ingredient Control: When you make these cups at home, you dictate every ingredient. Say goodbye to unwanted additives, artificial flavors, and preservatives often found in commercial candies. You choose the quality of your chocolate, the type of peanut butter, and the purity of your jam, ensuring a wholesome and delicious outcome.
- Tailored to Your Tastes: The beauty of homemade lies in customization. Want darker chocolate? Go for it! Prefer almond butter over peanut butter? Absolutely! Crave a different jam flavor, like strawberry or apricot? The possibilities are endless. This recipe is a fantastic canvas for your culinary creativity.
- Budget-Friendly Indulgence: High-quality vegan treats can often come with a hefty price tag. By making your own, you can enjoy these gourmet-level chocolate cups for a fraction of the cost, making regular indulgence both delicious and economical.
- Effortless Elegance: Despite their sophisticated appearance and complex flavor profile, these cups are remarkably easy to make. The process is straightforward, requiring minimal active time and yielding professional-looking results that are sure to impress friends and family.
- Perfect for Any Occasion: Whether you need a quick grab-and-go snack, an impressive dessert for a dinner party, a thoughtful homemade gift, or simply a sweet reward after a long day, these PB&J cups fit the bill perfectly. Their make-ahead nature makes them ideal for meal prepping healthy-ish treats.
- A Dairy-Free Dream Come True: For those avoiding dairy due to allergies, dietary choices, or ethical reasons, finding truly satisfying and accessible treats can be a challenge. This recipe provides a decadent solution, proving that plant-based doesn’t mean compromising on taste or texture.
Embrace the joy of creating something truly special and delectable in your own kitchen. These vegan PB&J chocolate cups are more than just a recipe; they’re an invitation to indulge wisely and deliciously.
Essential Ingredients for Your Vegan PB&J Cups
Crafting these delectable Dairy-Free PB&J Chocolate Cups starts with selecting the right ingredients. Each component plays a vital role in achieving that perfect balance of sweetness, tang, and creamy indulgence. Here’s a detailed look at what you’ll need:
Ingredients
-
2 16oz bags Enjoy Life Semi-Sweet Chocolate Chips
(or your preferred high-quality vegan chocolate chips. Ensure they are explicitly dairy-free to maintain the vegan integrity of the recipe. Brands like Guittard, Pascha, and Hu Kitchen also offer excellent vegan options.) -
2 tbsp refined coconut oil
(softened but not fully liquid. Refined coconut oil is crucial here as it has a neutral flavor, unlike unrefined which carries a distinct coconut taste. It helps the chocolate set firmly with a delightful snap, mimicking tempered chocolate without the extra effort.) -
6 tsp peanut butter
(salted and natural, preferably with only roasted peanuts and salt listed in the ingredients. The salt content is key to balancing the sweetness of the chocolate and jam, enhancing all the flavors. Avoid overly sweetened or hydrogenated varieties for the best texture and taste.) -
3-4 tsp raspberry jam
(seedless variety is recommended for a smoother mouthfeel and to avoid any textural interruption. Raspberry jam offers a beautiful tartness that brightens the entire treat. Feel free to use your favorite high-quality jam.)
Optional (but Highly Recommended) Topping
-
flakey sea salt
(I personally love Maldon’s flaky sea salt for its delicate crunch and potent burst of salinity. A tiny sprinkle on top takes these cups from delicious to absolutely sublime, further balancing the sweet and rich flavors.)
Step-by-Step Guide: Crafting Your Perfect PB&J Chocolate Cups
Creating these delightful vegan PB&J Chocolate Cups is a straightforward and rewarding process. Follow these detailed steps to ensure perfectly formed and incredibly delicious treats every time.
Instructions
1. Melt the Chocolate to Perfection
-
Combine your chosen vegan chocolate chips and softened refined coconut oil in a microwave-safe bowl. Heat this mixture in short bursts of 10-15 seconds. After each interval, remove the bowl and stir the chocolate vigorously. It’s crucial not to expect the chocolate to be fully melted directly from the microwave; the key is to allow the residual heat to melt the remaining solids as you stir. Repeat this heating and stirring process, typically 3-4 times, until the chocolate is completely smooth, glossy, and lump-free.
Pro Tip: Patience is your best friend here! Overheating chocolate in the microwave is a common mistake that can cause it to “seize,” resulting in a grainy, unusable texture. By melting in short increments and relying on thorough stirring, you maintain control over the temperature and ensure a silky-smooth chocolate base every single time. This method is far superior to trying to melt it all at once.
2. Assemble Your Layers of Deliciousness
-
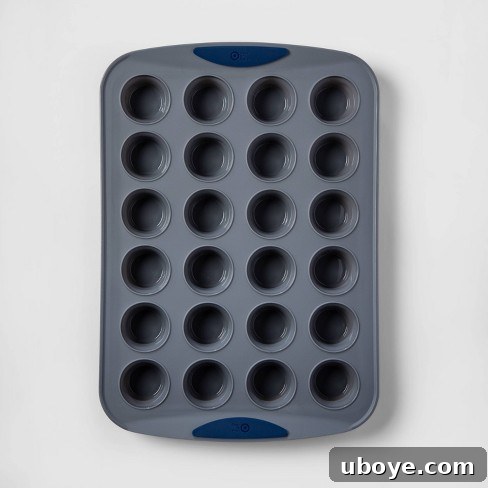
Prepare a 12-cup mini muffin tray. If you have a silicone mini muffin mold, this is highly recommended as it makes removing the set cups incredibly easy and mess-free. Alternatively, you can use paper liners or reusable silicone liners in a standard metal muffin tin. Pour the melted chocolate mixture into each cup, filling them approximately halfway.
Note: A silicone mini muffin mold truly simplifies the entire process. Its flexibility allows for effortless removal of the chocolate cups once they’ve set, preventing any breakage and preserving their perfect shape. If you don’t own one, it’s a worthwhile investment for future baking endeavors! -
Carefully add about 1/4 teaspoon of raspberry jam into the center of each chocolate-filled cup. Follow this with approximately 1/2 teaspoon of salted peanut butter, gently spooning it over the jam.
Technique Tip: Using two small teaspoons can make this step much easier. Use one spoon to scoop the jam and peanut butter, and the other to gently push and position the filling neatly into the center of the chocolate, ensuring it doesn’t touch the sides of the muffin cup. -
Once the jam and peanut butter layers are in place, cover each cup completely with additional melted chocolate until each mold is full. If you’re using flaky sea salt, sprinkle a small, sparing amount on top of each cup while the chocolate is still wet. This not only adds a beautiful visual appeal but also enhances the flavor profile. Transfer the tray to the freezer and chill for 10-15 minutes, or until the chocolate is completely set and firm.
Serve these exquisite Dairy-Free PB&J Chocolate Cups when they are firm and enjoy the delightful combination of flavors and textures!
Pro Tips for Flawless Vegan PB&J Chocolate Cups
Achieving the perfect homemade dairy-free PB&J chocolate cup is simple with a few insider tips. These insights, gathered from my own kitchen experiments, will ensure your treats are not just delicious, but also beautifully crafted and structurally sound.
Notes for Success
- The Magic of Refined Coconut Oil: I cannot stress enough the importance of using refined coconut oil when making homemade chocolate candies. Unlike unrefined coconut oil, which carries a distinct coconut flavor, refined coconut oil is neutral. More importantly, it contains fats that help the chocolate set firmly, giving it a beautiful, creamy texture and a satisfying “snap” similar to professionally tempered chocolate. This means you get all the structural benefits of tempering without the intricate process, making your homemade treats feel gourmet.
- Mindful Filling: The Art of Not Overfilling: When it comes to the jam and peanut butter layers, remember that less is often more. Resist the natural urge to heap copious amounts of filling into each cup. If you overfill, the delicious contents can leak out of the sides as the chocolate sets, creating a “chocolate sandwich” effect rather than a neatly contained cup. While a chocolate sandwich isn’t inherently bad, overfilled cups can be surprisingly difficult and messy to eat, detracting from the overall enjoyment. Aim for the recommended amounts to ensure a clean, perfect cup.
- Jam Selection & Alternatives: My top recommendation for this recipe is raspberry jam. Its bright, tart flavor cuts through the richness of the chocolate and complements the savory notes of the peanut butter in a truly exquisite way. However, don’t limit yourself! Any jam you adore will likely work beautifully. For an exciting variation, consider adding a fresh raspberry to the center instead of jam. This creates an “epic chocolate-covered strawberry” experience, adding a burst of fresh fruitiness. If using fresh fruit, remember to consume the cups within 2-3 days for optimal freshness.
- Optimal Storage for Best Texture: These cups are delightful whether stored in the refrigerator or the freezer. Leftovers can be kept in an airtight container in the fridge, maintaining a slightly softer texture. Personally, I prefer to store them in the freezer. When enjoyed straight from the freezer, the chocolate becomes wonderfully crunchy, while the peanut butter and jam retain a creamy, almost chewy consistency. This contrast in textures creates an incredibly satisfying bite. If you haven’t tried cold chocolate treats before, I highly encourage you to give this method a try!
- Don’t Waste That Extra Chocolate! Depending on the size and shape of your mini muffin pan, you might find yourself with a bit of leftover melted chocolate. Don’t let it go to waste! You can get creative: drizzle it artistically in a zig-zag pattern over the tops of your set PB&J cups for an extra textural element and visual flair. Alternatively, save it in a small container in the fridge for future treats. It’s perfect for enhancing ice cream sundaes later in the week, dipping fruit, or creating simple chocolate bark.
- The Power of Salted Peanut Butter: This might seem like a small detail, but using salted peanut butter makes a surprisingly significant difference in this recipe. The salt content acts as a flavor enhancer, balancing the sweetness of the chocolate and jam and bringing out the true depth of the peanut flavor. Opt for a natural version where the ingredients list primarily consists of roasted peanuts and salt, avoiding added sugars or oils for the best authentic taste.
- Recommended Equipment: The Silicone Mold Advantage: While regular paper liners work, investing in a silicone mini muffin tray is a game-changer for this recipe. Its non-stick properties and flexibility allow for incredibly easy removal of the set chocolate cups without any breakage or mess. This ensures your beautifully crafted treats maintain their perfect shape, making the entire process more enjoyable and less frustrating.
Creative Variations to Customize Your PB&J Cups
While the classic Dairy-Free PB&J Chocolate Cup recipe is perfect as is, it also serves as a fantastic base for creativity! Don’t hesitate to experiment with these variations to tailor the treats to your unique preferences or to simply explore new flavor combinations.
- Nut Butter Swaps: Not a peanut butter fan, or looking for an alternative? Try almond butter, cashew butter, or even sunflower seed butter for a nut-free option. Each will bring its own distinct flavor profile to the treat. Ensure your chosen nut/seed butter is natural and unsweetened for the best results.
- Jam Flavors Galore: While raspberry is my go-to for its tartness, feel free to experiment with other jams. Strawberry jam offers a sweeter, more traditional “PB&J” vibe, while apricot jam brings a lovely floral and slightly tangy note. For something truly unique, consider a blackberry jam or even a cherry preserve.
- Chocolate Adventures: Don’t stick solely to semi-sweet! Dark vegan chocolate chips will create a more intense, sophisticated flavor, while vegan “milk” chocolate chips (made with oat, rice, or almond milk) will yield a creamier, sweeter treat. You could even try a blend of different vegan chocolates.
- Crunchy Add-Ins: For those who love extra texture, consider sprinkling finely chopped roasted nuts (like peanuts, almonds, or pecans) on top of the melted chocolate layer before chilling. A sprinkle of shredded coconut, either toasted or raw, can also add a delightful chewiness and tropical hint.
- Citrus Zest Boost: A tiny pinch of orange or lemon zest folded into the melted chocolate or sprinkled over the jam can add a surprising burst of freshness that complements the sweetness beautifully.
- Spice It Up: A very small pinch of cayenne pepper in the chocolate, or a dash of cinnamon with the peanut butter, can introduce a subtle warmth and complexity for an adventurous palate.
- Mini vs. Standard Size: While the recipe calls for mini muffin trays, you can easily make larger, standard-sized cups. Just remember to adjust the ingredient quantities for each layer (more chocolate, jam, and peanut butter per cup) and potentially increase the chill time until fully set.
These variations prove that your homemade vegan PB&J chocolate cups can be a constant source of delightful surprises. Don’t be afraid to make them your own!
Serving and Storage Suggestions for Your Delicious Treats
These delectable Dairy-Free PB&J Chocolate Cups are incredibly versatile, making them perfect for a wide range of occasions. Knowing how to serve and store them properly will ensure you enjoy every single bite to its fullest potential.
Serving Suggestions:
- Coffee Break Companion: Pair one or two with your afternoon coffee or tea for a truly satisfying and indulgent break.
- Movie Night Must-Have: Elevate your movie night snack game by enjoying these alongside a bowl of salty, buttered (vegan butter, of course!) popcorn. The sweet-and-salty combination is pure bliss.
- Elegant Dessert: Serve them as a bite-sized dessert after a meal. Their rich flavor and appealing appearance make them a sophisticated end to any dinner.
- Lunchbox Treat: Pop one into a lunchbox for a delightful midday surprise (just ensure it stays cool if packed for long periods).
- Thoughtful Gift: Arrange a selection in a beautiful box or bag for a homemade gift that’s sure to impress friends, family, or colleagues.
Storage:
Proper storage is key to maintaining the texture and freshness of your homemade chocolate cups. You have two excellent options:
- Refrigerator Storage: Store the cups in an airtight container in the refrigerator for up to 1-2 weeks. When chilled in the fridge, the chocolate maintains a firm but slightly softer consistency, while the peanut butter remains creamy and the jam is cool and spreadable. This is ideal if you prefer a less crunchy texture.
- Freezer Storage: For a firmer, chewier bite and an extended shelf life, store the cups in an airtight container in the freezer for up to 1-2 months. As mentioned in the tips, enjoying them straight from the freezer offers a wonderful contrast of crunchy chocolate and creamy, cold filling. This method is particularly great for meal prepping a larger batch and having treats ready whenever a craving strikes.
Always ensure the container is airtight to prevent freezer burn or absorption of other food odors, which could compromise the delicate flavors of your PB&J cups.