

If you’re already a fan of my signature no-knead focaccia—known for its irresistible fluffiness, beautiful golden crust, and consistent perfection—then get ready for a delightful new obsession. We’re taking that beloved recipe and giving it a mouthwatering sweet transformation. Introducing my exquisite Cinnamon Scroll Sweet Focaccia! Imagine the comforting aroma and rich flavor of buttery cinnamon swirls, baked into that same iconic, pillowy focaccia dough, then generously finished with a luscious, dreamy glaze. This isn’t just a dessert; it’s an experience, a brunch showstopper, and an absolute must-make for any sweet craving. Forget everything you thought you knew about focaccia, because this sweet version is about to become your new favorite treat.
Are you captivated by the charm of focaccia? Explore more of my cherished recipes like the savory green olive focaccia or the crowd-pleasing pizza focaccia for diverse culinary adventures!

My no-knead focaccia dough remains a staple in my kitchen for a reason: its simplicity, incredible fluffiness, and boundless versatility. Whether I’m crafting a classic rendition with aromatic garlic confit and rosemary or embarking on culinary experiments with creative savory toppings, this dough consistently delivers. Today, however, we’re venturing into the world of sweet indulgence with an exciting twist: the Cinnamon Scroll Sweet Focaccia. This recipe marries the rustic charm of traditional focaccia with the comforting sweetness of a classic cinnamon roll, resulting in a truly irresistible baked good.
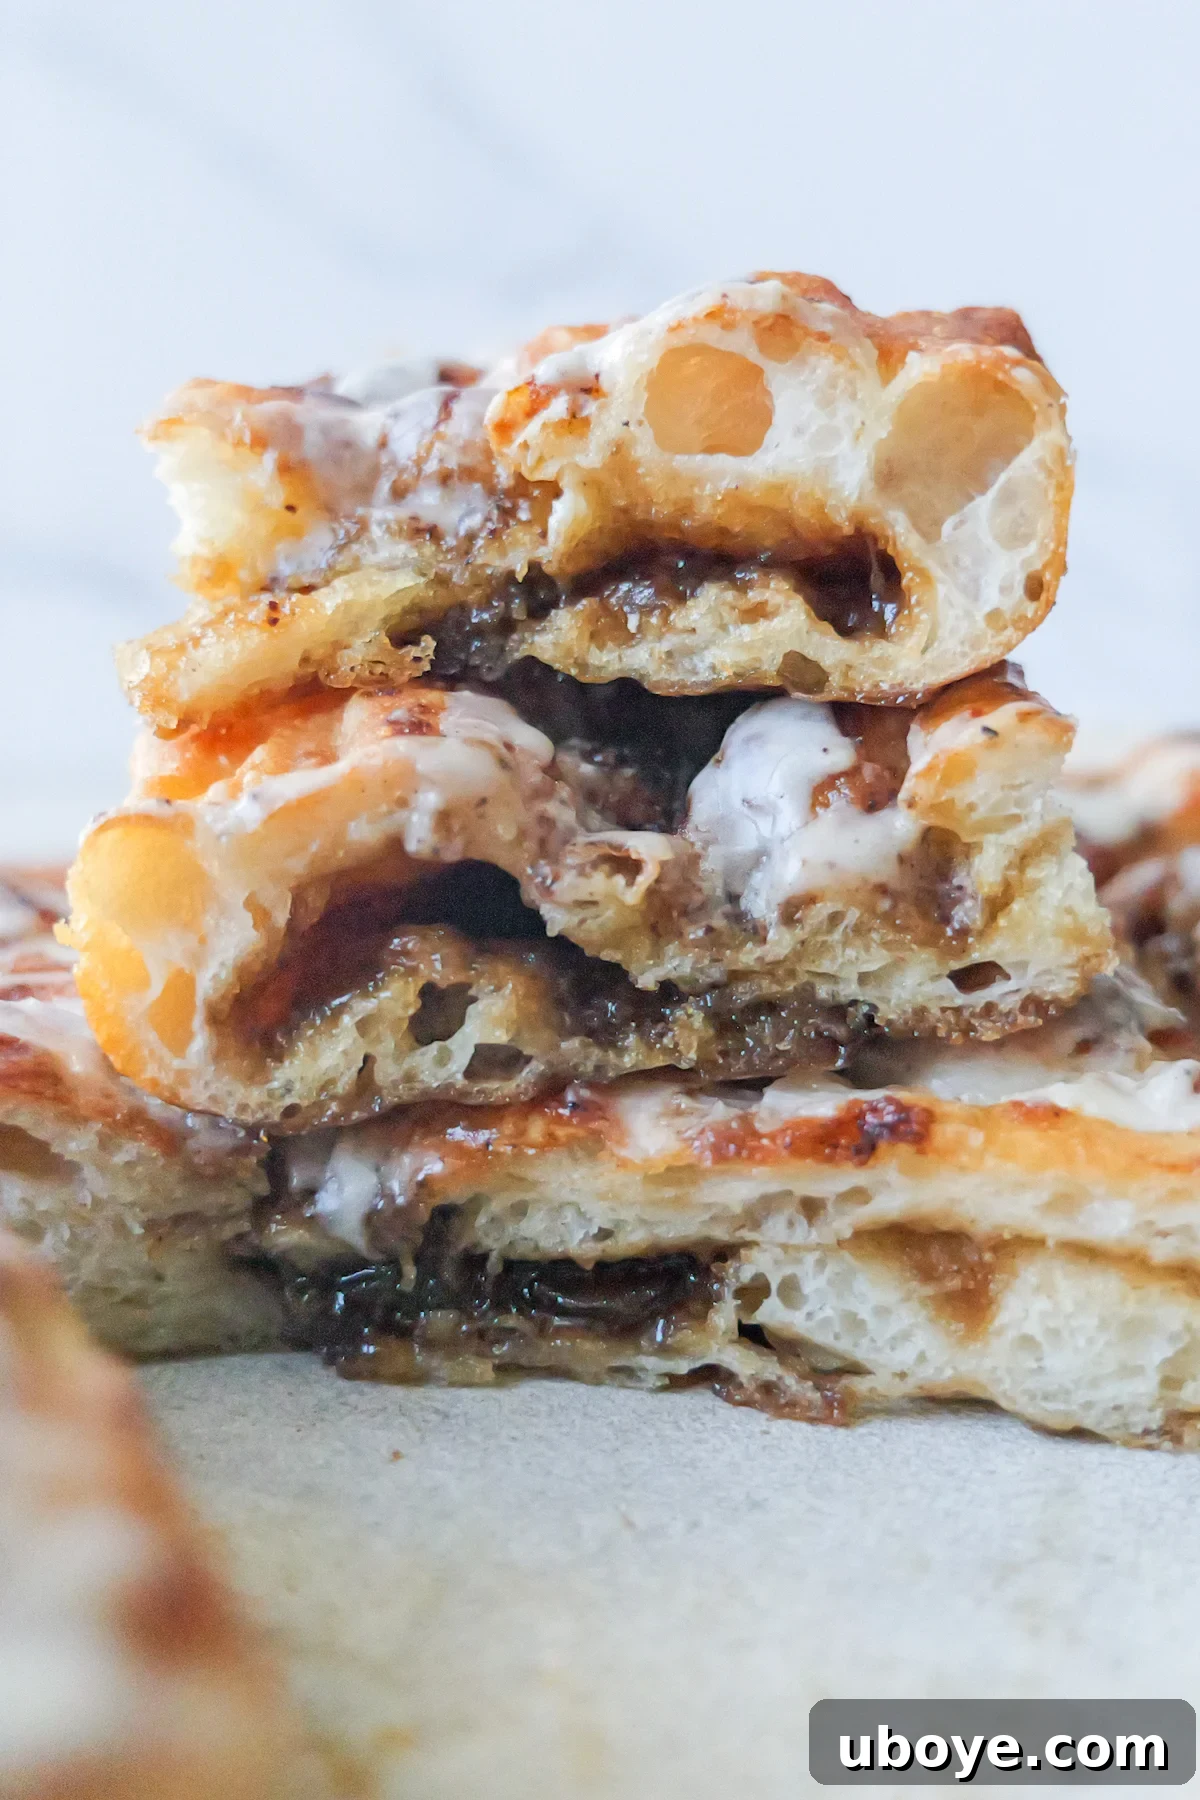
Picture this: a supremely soft, airy focaccia, lovingly swirled with a rich, buttery cinnamon sugar filling. It bakes to a perfect golden hue, bubbling gently as the cinnamon caramelizes, then it’s crowned with a glossy, sweet glaze that beautifully melts into every dimple and crevice. It’s like a giant, rustic cinnamon roll that you can tear apart and share, offering the ultimate comfort food experience. And yes, it’s even more enchanting than it sounds – a true testament to the magic that happens when two beloved baked goods come together.
This sweet focaccia is an ideal choice for any occasion that calls for something special yet effortlessly impressive. Serve it warm for a delightful brunch, an indulgent dessert after dinner, or as a cozy afternoon treat with a cup of coffee. The beauty of this recipe lies in its ability to deliver immense flavor with surprisingly minimal effort. There’s no arduous kneading, no complicated techniques—just pure, sweet, cinnamon-spiced magic waiting to be discovered.
This recipe is proudly sponsored by our cherished friends at Westgold Butter, whose quality ingredients truly elevate this decadent treat.
Why You’ll Absolutely Love This Sweet Focaccia Recipe
This isn’t just another sweet treat; it’s a culinary revelation that combines simplicity with unparalleled flavor. Here are just a few reasons why this Cinnamon Scroll Sweet Focaccia will quickly become a favorite in your kitchen:
- Effortless No-Knead Dough: Say goodbye to strenuous kneading and complicated techniques. The dough for this focaccia practically prepares itself, requiring only simple folding to develop its structure. This means you can achieve impressive, bakery-quality results with minimal hands-on time, making it perfect for busy bakers or those new to yeast baking. It’s all the ‘wow’ factor without any of the hard work.
- Iconic Cinnamon Scroll Flavors in a Rustic Form: Imagine the comforting, spiced sweetness of your favorite cinnamon roll, but reimagined in a gloriously rustic, golden focaccia. This recipe delivers all those beloved buttery cinnamon swirls, but with the added depth and satisfying chewiness that only focaccia can provide. The pillowy soft interior contrasts beautifully with the slight crispness of the crust, creating a textural paradise with every bite.
- Perfectly Sweet, Soft, and Glazed Perfection: Each piece of this sweet focaccia offers a harmonious blend of flavors and textures. The dough itself is subtly sweet and incredibly soft, infused with rich, nutty brown butter. The cinnamon sugar filling melts into gooey pockets of delight, and the whole creation is crowned with a glossy, simple glaze that cascades into every golden crevice. The result is a melt-in-your-mouth experience that is buttery, warmly spiced, and utterly decadent—a truly divine treat for any palate.
Essential Ingredients for Your Sweet Focaccia
Crafting this irresistible sweet focaccia requires a thoughtful selection of ingredients, each playing a vital role in achieving its signature flavor and texture. Before we begin our baking journey, let’s explore the key components you’ll need to bring this delightful creation to life. The magic lies in the quality and balance of these simple elements.
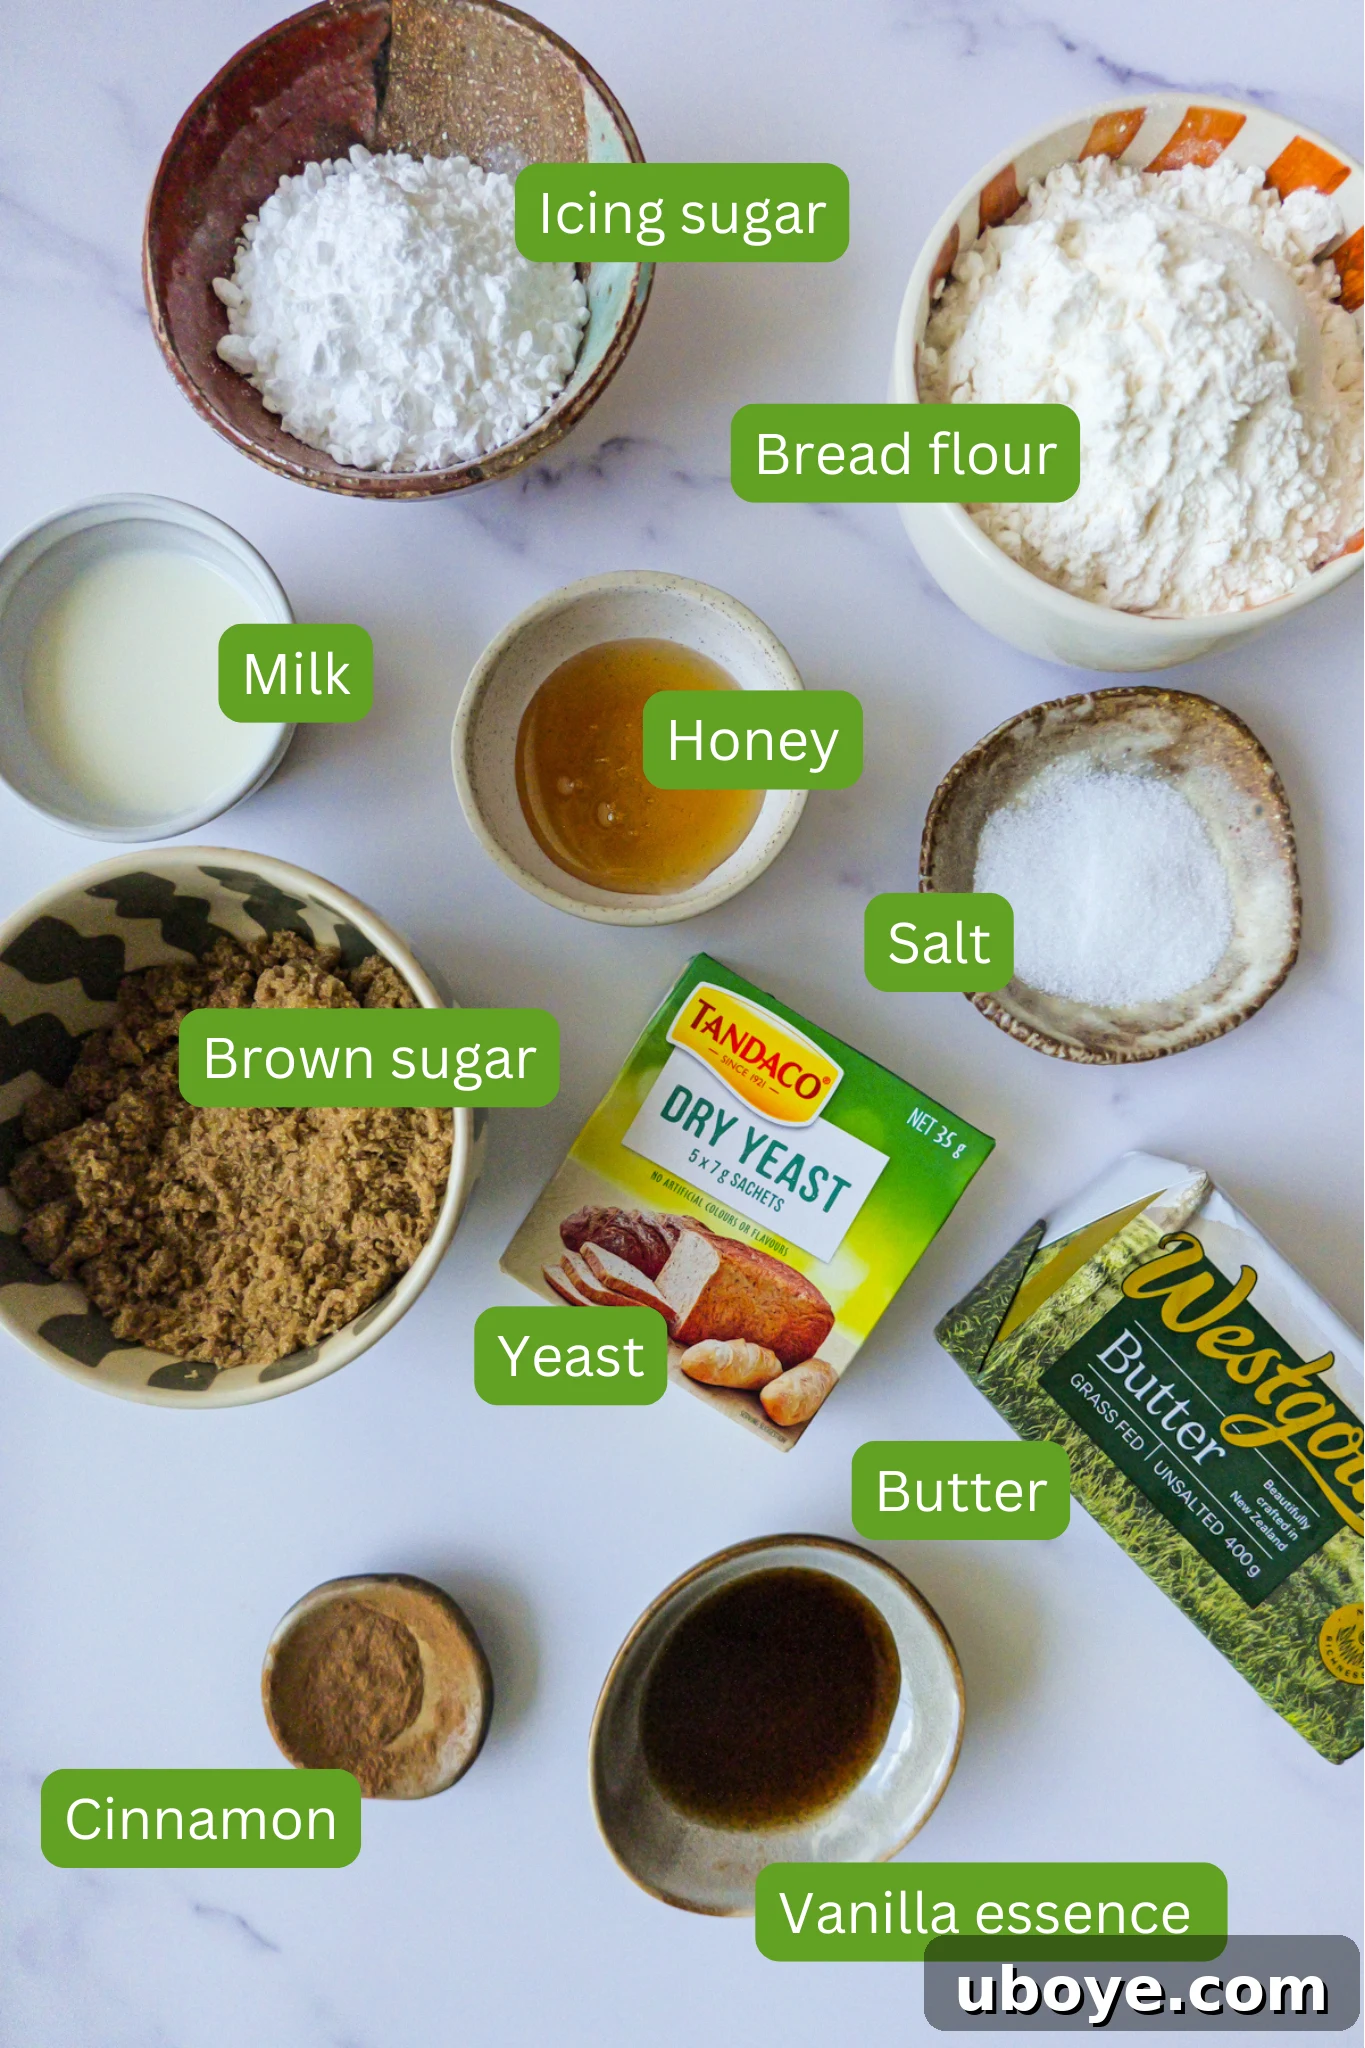
- Brown Sugar: This isn’t just any sweetener; brown sugar brings a deep, rich, and slightly caramelized sweetness that beautifully complements the warm notes of cinnamon. Its molasses content also contributes to a wonderfully moist and tender crumb in the filling.
- Butter: Melted and generously swirled through the dough, butter is the foundation of that classic cinnamon scroll flavor. For this recipe, we elevate the experience by browning the butter, which adds an incredible depth of nutty, toasted flavor that makes the focaccia truly extraordinary. It creates those luscious, gooey pockets that are so characteristic of a sweet roll.
- Icing Sugar (Powdered Sugar): Essential for our simple yet dreamy glaze. When whisked with a few other ingredients, it transforms into a smooth, pourable topping that melts gloriously into the warm focaccia, providing the perfect sweet, creamy finish. Its fine texture ensures a lump-free, elegant glaze.
- Yeast: The star of any risen bread, yeast is responsible for the focaccia’s signature airy and pillowy texture. Activated in lukewarm water, it works its magic, creating pockets of air that result in an incredibly light and digestible dough.
- Flour: While bread flour is recommended for its higher protein content, yielding a chewier crumb, all-purpose flour also works wonderfully, producing a soft and fluffy texture that’s perfect for this no-knead recipe.
- Honey: A touch of honey not only adds subtle sweetness to the dough but also aids in activating the yeast, giving it a boost to create a perfectly risen focaccia.
- Salt: Crucial for balancing the sweetness and enhancing all the other flavors. It also plays a key role in controlling yeast activity and strengthening the gluten structure of the dough.
A complete ingredient list with precise measurements for each component can be found in the detailed recipe card below, ensuring you have everything you need for success.
Crafting Your Cinnamon Scroll Sweet Focaccia: A Step-by-Step Guide
Turning a simple no-knead dough into this ultimate sweet treat is a journey of delightful anticipation. Follow these steps to create a beautiful, cinnamon-swirled masterpiece, finished with a glistening glaze that’s as impressive as it is delicious.
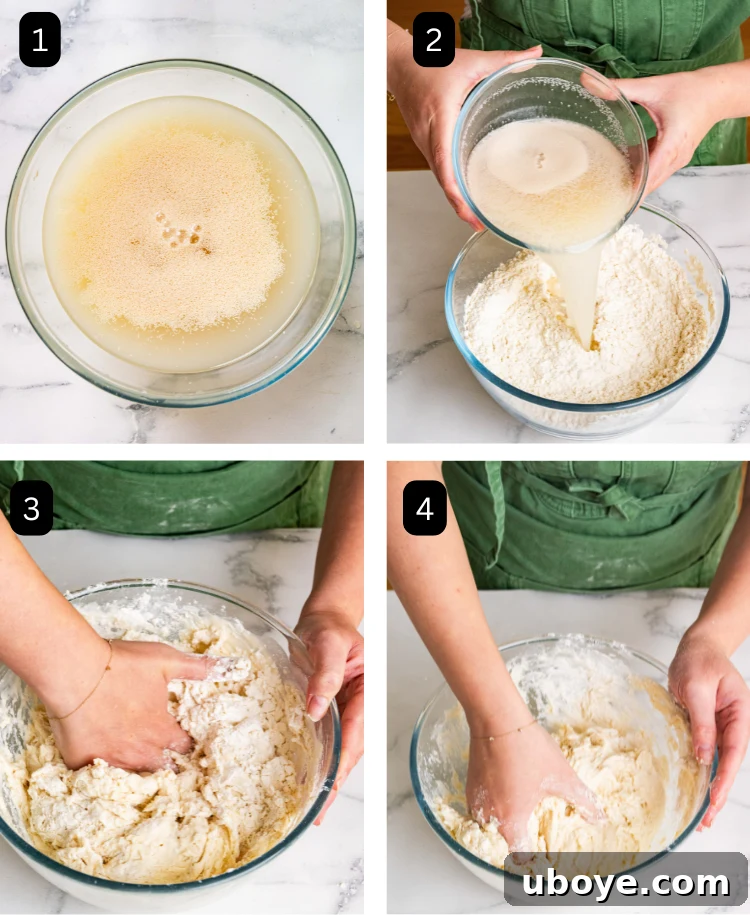
- Step 1: Activate the Yeast. In a medium-sized bowl, gently whisk together lukewarm water, active dry yeast, and honey. The water should be around 100°F (34°C) – warm enough to activate the yeast but not too hot to kill it. Allow this mixture to rest for approximately 5 minutes. You’ll know the yeast is alive and well when the mixture becomes frothy and bubbly, indicating it’s ready to work its magic (image 1).
- Step 2: Combine Dry Ingredients. In a separate, larger bowl, whisk together the bread flour and fine sea salt until thoroughly combined. This ensures even distribution of salt throughout the dough (image 2).
- Step 3: Mix Wet and Dry. Pour the activated yeast mixture into the bowl with the whisked flour and salt. Using a sturdy spoon or your clean hands, begin to mix the ingredients together. The goal is to combine everything until no dry spots of flour remain (image 3).
- Step 4: Form the Dough & Rest. Continue mixing until you achieve a wet, sticky dough. Don’t worry if it looks shaggy or messy; its high hydration is key to its tender texture. Once mixed, cover the bowl tightly with plastic wrap or a damp kitchen towel and let it rest for 10 minutes. This initial rest period, often called autolyse, allows the flour to fully hydrate and gluten development to begin before the first stretch and fold (image 4).
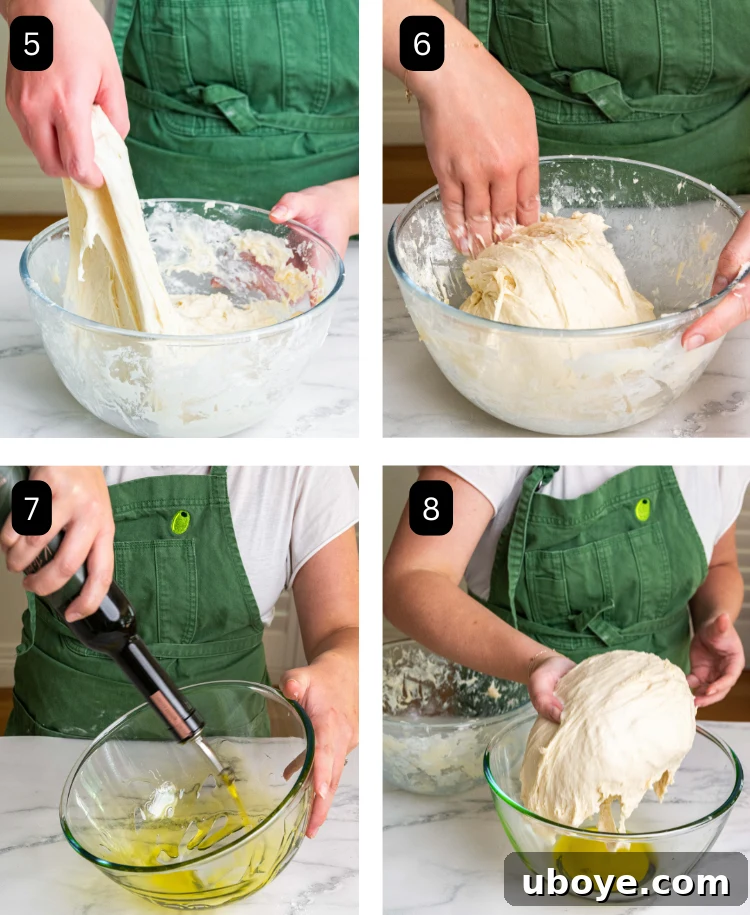
- Step 5: First Stretch and Fold. After the 10-minute rest, lightly dampen your hands. Gently grab a portion of the dough from the edge of the bowl, stretch it upwards, and fold it back over itself towards the center. Rotate the bowl a quarter turn and repeat this stretching and folding action three more times. This method builds strength in the dough without kneading. Cover the dough again and let it rest for another 10 minutes (image 5).
- Step 6: Continue Stretching and Folding. Repeat the stretch and fold process (Step 5) two to three more times, with 10-minute rests in between each set. As you continue, you’ll notice the dough becoming smoother, more elastic, and forming into a cohesive ball. This gentle handling develops the gluten structure, which is crucial for the focaccia’s airy texture (image 6).
- Step 7: First Proof (Cold Fermentation). Lightly coat a new, clean bowl with about 20g of olive oil, ensuring the entire inner surface is greased. Carefully transfer the dough into this oiled bowl (image 7 & 8). Cover the bowl tightly with plastic wrap to prevent a skin from forming and place it in the refrigerator. This first proof, also known as cold fermentation, should last anywhere between 12 to 72 hours. The longer the dough proofs in the fridge, the more complex and delicious its flavor will become. For this recipe, you’ll only need half of the dough; the other half can be saved for another focaccia creation.
- Step 8: Prepare the Brown Butter and Filling. Start by making the brown butter (refer to the recipe card for detailed instructions on browning butter). Once cooled slightly, transfer two-thirds of this nutty brown butter to a separate bowl. Combine it with the brown sugar, vanilla paste, and cinnamon. Mix thoroughly until you have a rich, aromatic cinnamon-sugar filling. Line your baking tin (approximately 9×13 inches) with parchment paper and drizzle one-third of the reserved brown butter evenly over the bottom.
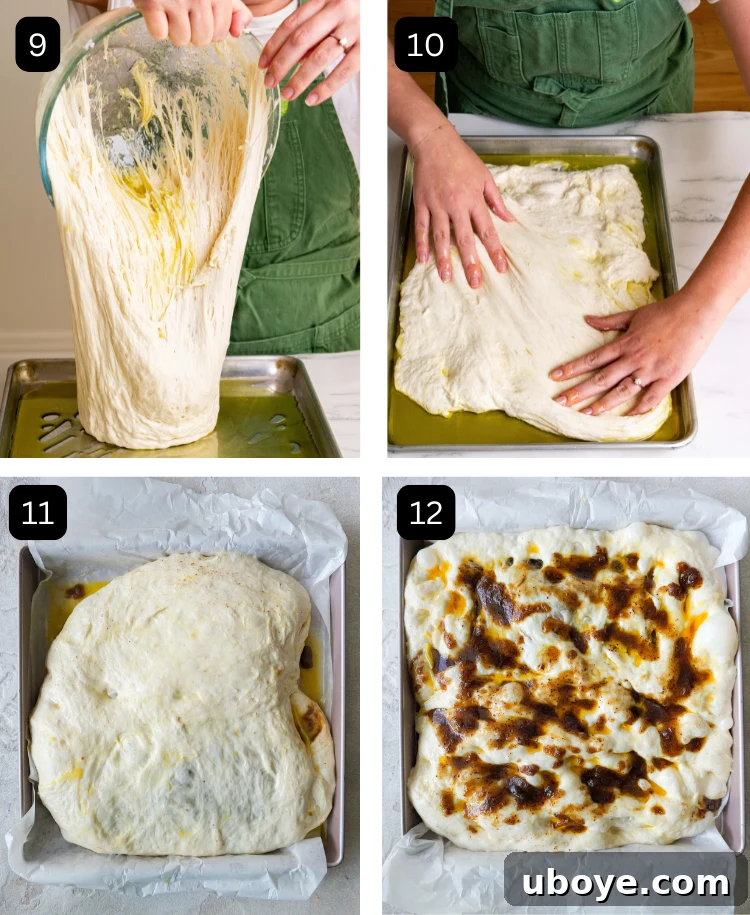
- Step 9: Shape and Fill the Dough. Carefully transfer one half of your cold-proofed dough onto the prepared baking tin (image 9). Gently begin to stretch the dough with your hands to form a rough rectangle. Avoid stretching it all the way to the edges of the tin just yet, as it will naturally spread as it rises during the second proofing stage (image 10). Evenly spread two-thirds of the delicious brown sugar and cinnamon filling over the stretched dough. Now, carefully fold the edges of the dough over the filling, creating a sealed pocket, or until the filling is fully enclosed by the dough. Flip the dough over so the seam is underneath (image 11).
- Step 10: Second Proof. Lightly cover the filled focaccia dough with a damp kitchen cloth to prevent it from drying out. Place it in a warm spot in your kitchen for approximately 2 hours. During this second proof, the dough will relax, rise significantly, and become wonderfully puffy, ready for baking.
- Step 11: Dimple and Drizzle. After the dough has completed its second rise and is visibly puffy, gently dimple the surface with your fingertips. Be firm enough to create indentations but careful not to deflate all the precious air. The remaining one-third of the brown butter filling might have solidified; if so, microwave it for about 30 seconds to loosen it up. Generously drizzle this remaining fragrant filling all over the dimpled focaccia surface. This final layer of butter and sugar will caramelize beautifully during baking (image 12).
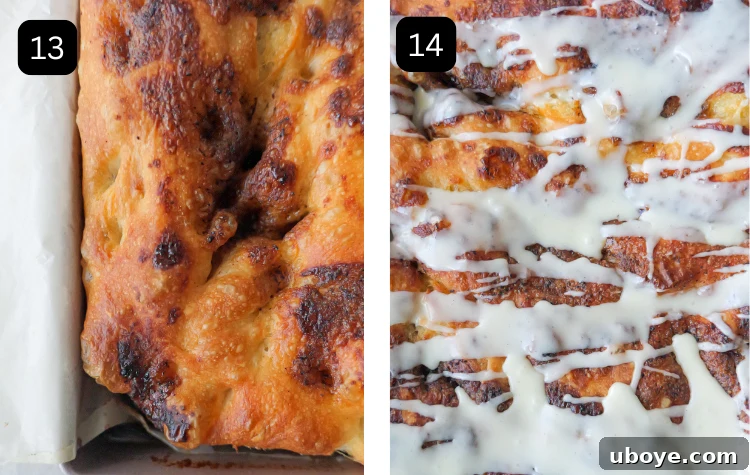
- Step 12: Bake to Golden Perfection. Preheat your oven to 200°C (390°F). Carefully place the prepared focaccia into the hot oven and bake for approximately 30 minutes. It’s ready when the top is gorgeously golden brown, and the edges are slightly crisp, filling your kitchen with an irresistible cinnamon aroma (image 13).
- Step 13: Glaze and Serve. While the focaccia is baking, prepare your glaze. In a bowl, combine the icing sugar, melted butter, milk, and vanilla paste, mixing until smooth and pourable. Once the focaccia is out of the oven, let it cool slightly on a wire rack for about 10-15 minutes. While still warm, generously drizzle the prepared glaze all over the top, allowing it to seep into the dimples and create a beautiful, shiny finish (image 14). Slice up and enjoy this warm, sweet, and utterly delightful Cinnamon Scroll Sweet Focaccia!
Frequently Asked Questions About Sweet Focaccia
Can I make sweet focaccia without kneading the dough?
Absolutely, that’s the beauty of this recipe! This Cinnamon Scroll Sweet Focaccia specifically utilizes a no-knead focaccia dough. This method relies on time and a few gentle stretch-and-fold techniques rather than vigorous kneading to develop gluten. It results in an incredibly light, airy, and fluffy texture with significantly less effort than traditional bread making, making it perfect for beginners and experienced bakers alike.
Can I prepare the focaccia dough in advance?
Yes, and I highly recommend it! Preparing the focaccia dough in advance is one of the secrets to its deep flavor and convenience. You can let the dough undergo its first proof in the refrigerator for a minimum of 12 hours and up to 72 hours. This cold fermentation not only makes your bake day much easier by spreading out the work but also allows the dough to develop more complex, nuanced flavors, resulting in a superior focaccia.
Can I freeze sweet focaccia?
Indeed, sweet focaccia freezes beautifully! To preserve its freshness and flavor, slice the cooled focaccia into individual portions before freezing. Wrap each slice tightly in plastic wrap, then place them in an airtight freezer-safe bag or container. When you’re ready to enjoy, simply reheat a slice in the oven (for a crispier crust) or microwave (for a softer texture) until warmed through. It maintains its soft texture and delicious taste wonderfully.
Can I make focaccia without bread flour?
Certainly! While bread flour is often preferred for its higher protein content, which contributes to a chewier focaccia, all-purpose flour is a fantastic and readily available substitute. It works exceptionally well in no-knead recipes like this one, still yielding a wonderfully soft, fluffy texture with a delightful crisp, golden crust. Don’t hesitate to use all-purpose flour if that’s what you have on hand; your sweet focaccia will still be incredibly delicious.
Serving Suggestions for Your Sweet Focaccia
This Cinnamon Scroll Sweet Focaccia is incredibly versatile and makes a stunning addition to any meal or gathering. It’s the perfect sweet finish to a cozy dinner, offering just the right touch of indulgence without being overly heavy. Serve it warm, perhaps after a comforting main course like a succulent roast chicken with vibrant salsa verde, tender garlicky slow-cooked lamb shoulder, or a hearty baked ziti. It provides a delightful contrast with its sweet, spiced notes. For a sophisticated dinner party, slice it into elegant portions and present it family-style alongside freshly brewed coffee, a rich espresso, or even a glass of dessert wine for a creative twist on traditional after-dinner treats. To truly elevate the experience, consider pairing a warm slice with a scoop of creamy vanilla gelato or a dollop of lightly sweetened whipped mascarpone cheese. For brunch, it’s magnificent on its own with a cup of tea, or as part of a larger spread with fresh fruit and yogurt.
Storing Your Cinnamon Scroll Sweet Focaccia
While leftovers of this irresistible focaccia are rare, it’s good to know how to properly store it to maintain its delectable quality. For short-term storage, keep your sweet focaccia in an airtight container at room temperature for up to 2 days. It will retain its wonderfully soft and delicious texture. If you need to store it for a bit longer, transfer it to the refrigerator, where it will stay fresh for up to 5 days. To bring back its warm, fluffy texture and aromatic qualities, gently reheat chilled slices in the microwave for a few seconds, in a toaster oven until warmed through, or briefly in a conventional oven. For extended storage, individual slices can be frozen for up to one month. Simply wrap each slice tightly in plastic wrap, then place them in a freezer-safe bag. When ready to enjoy, thaw at room temperature or reheat directly from frozen in the oven or toaster until warmed through and lightly crisped—it will taste almost as fresh as the day it was baked!
Discover More Sweet Delights to Indulge In
Sweets
Strawberries and Cream Sponge Cake
Sweets
Refrigerator Strawberry Jam
Sweets
Lemon Curd Meringue Roulade
Sweets
Blueberry, Lemon & Ricotta Olive Oil Cake
Do you have questions about this Cinnamon Scroll Sweet Focaccia recipe, or would you like to share your review? Please feel free to comment below the recipe card! I always look forward to answering your queries and hearing your valuable feedback.
If you create this wonderful recipe, I would love for you to follow and tag me on Instagram, TikTok, or Pinterest so I can admire your beautiful creations and share them with our community!
Cinnamon Scroll Sweet Focaccia
Daen Lia
1 day
2 hours
30 minutes
30 minutes
6
Ingredients
Filling
- 10 tbsp Westgold butter, unsalted
- 1 cup brown sugar
- 1 tsp vanilla paste
- 1 tsp cinnamon
Glaze
- 2 cups icing sugar
- 4 tbsp butter, melted
- 1 tbsp milk, full cream
- 1 tsp vanilla paste
Focaccia dough
- 700 g bread flour
- 680 g lukewarm water, (100°F / 34°C) – 98% hydration
- 7 g dry yeast
- 12 g fine sea salt
- 1 tsp honey
- 2 tbsp brown butter (for the dough itself)
Instructions
Filling Preparation
-
Brown Butter: Place 10 tbsp unsalted butter into a pan over medium heat. Stir continuously as the butter melts, then begins to sizzle and foam. Continue stirring for 5 – 8 minutes until the butter transforms into a rich, golden-brown color and emits a distinct nutty aroma. You will notice the milk solids at the bottom of the pan becoming toasty brown. Remove from heat and allow the brown butter to cool slightly before use.
-
Prepare Filling: Transfer two-thirds of the slightly cooled brown butter to a bowl. Add the brown sugar, vanilla paste, and cinnamon. Mix all these ingredients thoroughly until they are well combined, creating a thick, fragrant paste. Set aside.
Glaze Preparation
-
Mix Glaze: In a clean bowl, combine the icing sugar, 4 tbsp melted butter, milk, and 1 tsp vanilla paste. Mix with a handheld mixer or vigorously by hand until all ingredients are well combined and smooth. The glaze should have a runny, pourable consistency. If too thick, add a tiny bit more milk; if too thin, add more icing sugar.
Focaccia Dough Preparation & Baking
-
Activate Yeast: In a medium bowl, combine 680g lukewarm water, 7g dry yeast, and 1 tsp honey. Stir with a whisk and let stand for about 5 minutes until the mixture becomes visibly frothy, indicating active yeast.
-
Combine Ingredients: In a large bowl, whisk together 700g bread flour and 12g fine sea salt. Pour the frothy yeast mixture into the dry ingredients. Mix with a spoon or your hands until a wet, sticky dough forms and there are no dry spots of flour. Cover the bowl with plastic wrap or a damp cloth and let rest for 10 minutes.
-
Stretch and Fold (Repeated): After resting, dampen your hands. Gently stretch a section of the dough upwards from the bowl and fold it over itself. Rotate the bowl and repeat this action three more times. Cover the dough and let it rest for another 10 minutes. Repeat this stretch and fold process 2-3 more times (total of 3-4 sets), with 10-minute rests in between. On the final set, continue stretching and folding until the dough begins to form a more cohesive ball.
-
First Proof (Cold Fermentation): Coat a new bowl with 20g of olive oil (or 2 tbsp brown butter, as per ingredients list – 2 tbsp of brown butter can be used here for extra flavour or olive oil). Place the dough inside, ensuring it’s well coated. Cover tightly with plastic wrap. Let it rest in the fridge for 12 to 72 hours for its first proof. This recipe only uses half of this dough; save the other half for a future focaccia.
-
Second Proof & Filling: Line a baking tin with parchment paper and drizzle one-third of the brown butter (the portion reserved from step 8) into it. Carefully transfer half of your cold-proofed dough to the tin. Gently stretch the dough into a rough rectangle, leaving some space from the edges as it will spread. Spread two-thirds of the prepared cinnamon filling (from step 8) evenly over the dough. Fold the edges of the dough over the filling to enclose it, then gently flip the dough over. Cover with a damp cloth and let it rise in a warm spot for 2 hours for its second proof.
-
Preheat Oven: Preheat your oven to 200°C (390°F) while the focaccia finishes its second proof.
-
Dimple & Bake: After the dough has risen, use your fingers to gently dimple the surface. The remaining cinnamon filling (from step 8) may have set; warm it in the microwave for 30 seconds to loosen it, then generously drizzle it over the dimpled focaccia. Bake for 30 minutes, or until the top is golden brown and caramelized.
-
Rest & Glaze: Remove the focaccia from the oven and allow it to cool slightly in the tin before carefully transferring it to a wire rack. Let it rest for about 30 minutes. While still warm, generously drizzle the prepared glaze (from Glaze Preparation) all over the focaccia. Slice into portions and savor your homemade Cinnamon Scroll Sweet Focaccia.
Helpful Notes for Success
- Dough Prep Time: Remember that this focaccia dough requires significant proofing time (especially the cold fermentation), so plan accordingly and prepare the dough in advance. The waiting is worth it for the flavor development!
- Yeast Options: This recipe calls for active dry yeast, which is activated in water. If you prefer to use instant yeast, there’s no need to activate it separately; simply add it directly to your dry ingredients along with the water and honey.
- Flour Alternatives: While bread flour provides a slightly chewier texture, excellent results can also be achieved using good quality all-purpose flour. It will still yield a soft, fluffy focaccia.
- Brown Butter Magic: Browning the butter is an optional but highly recommended step. It infuses the focaccia with a deeper, nuttier, and more complex flavor that truly sets this recipe apart from a standard cinnamon roll. Don’t skip it if you want that extra layer of deliciousness!
Nutrition Information (per serving)
Carbohydrates: 124g
Protein: 15g
Fat: 29g
Saturated Fat: 17g
Polyunsaturated Fat: 2g
Monounsaturated Fat: 7g
Trans Fat: 1g
Cholesterol: 71mg
Sodium: 1000mg
Potassium: 191mg
Fiber: 3g
Sugar: 39g
Vitamin A: 824IU
Vitamin C: 0.02mg
Calcium: 64mg
Iron: 1mg
Nutrition information is automatically calculated, so should only be used as an approximation.

Like this? Leave a comment below!